How to Configure Audio Device Priorities in Pipewire / Wireplumber

Posted by Scott on Aug 1st, 2022

I have several audio devices connected to my Linux desktop machine, including a USB audio interface (a MOTU M4), and a Jabra wireless headset that uses a USB dongle, and appears as its own audio device. I also like to use Bluetooth headphones on a daily basis.

After switching to Pipewire as my audio backend, I found that my default audio device wasn’t switching automatically to what I wanted – I’d always have to set it manually. I’d need to do this when my BT headphones would connect (select the a2dp headphone profile), and then again when I disconnected them (because I wanted to hear sound from my MOTU audio interface, but it would automatically fallback to the Jabra headset device). This is a two-part recipe to fix these issues.

Step 1: Make pipewire automatically select my Bluetooth headphones sink when they connected. This didn’t require any configuration changes. Instead, I have a script which runs on startup of my desktop environment which runs pactl load-module module-switch-on-connect. This is actually a pulseaudio command, but desktop apps still use the pulseaudio interface, which pipewire implements as part of the pipewire-pulse package.

Step 2: Make my default audio device my MOTU M4 audio interface, and stop selecting the Jabra headset device when I disconnect my BT headphones. This turned out to be caused by the fact that the Jabra audio device had a higher priority than my audio interface. Run the command wpctl status to show a list of your audio devices, and make a note of the device number. In this case, I was looking for the M4 device in my list of Audio Sinks. Then you can run wpctl inspect <device-number> to show the details of this audio device. What you’re looking for are the fields priority.driver and priority.session. Larger numbers correspond to a higher priority, but for sinks, they should be kept no larger than 1500 (otherwise a sink’s monitor could end up being selected as a default source – this is called out in the Wireplumber documentation). In my case, the Jabra sink had a priority of 1008, so I chose to set my audio interface to a priority of 1050.

To change this configuration, you’d do so in Pipewire’s session manager. The preferred session manager for Pipewire is Wireplumber, which uses lua scripts to apply these kinds of custom configurations. So in my case, I created the file ~/.config/wireplumber/main.lua.d/60-raise-motu-m4-priority.lua with the following code:

rule = {
  matches = {
    {
      { "node.name", "equals", "alsa_output.usb-MOTU_M4_M4MC0570FU-00.Direct__hw_M4__sink" },
    },
  },
  apply_properties = {
    ["priority.driver"] = 1050,
    ["priority.session"] = 1050,
  },
}

table.insert(alsa_monitor.rules,rule)

Then, restart the wireplumber service with systemctl --user restart wireplumber and compare the new output from wpctl inspect. You should now see that the driver and session priorities are what you set them to. And when pipewire automatically switches to a new audio device, the highest priority device should be chosen.

I’ve found Pipewire and Wireplumber’s documentation to be confusing, and there are lots of dead-ends you can go down when researching how to do this. I hope this recipe-style blog post is easier to understand if this is the problem you’re trying to solve.

Many thanks to PleasantlyFlailing on the r/linuxaudio subreddit for suggesting some improvements to this blog post!
How to Disable Audio Devices in Pipewire / Wireplumber

Posted by Scott on Aug 1st, 2022

I’ve recently made the switch to using Pipewire on my Linux desktops. One thing I noticed in my list of audio devices was an entry for my HDMI monitor, which I never planned to use. I also do some music production on my Linux machines, and disabling this audio device would help my patchbay configurations look a bit cleaner.

Pipewire’s documentation is pretty basic, and when searching for this solution online, I went down several incorrect paths. We could really use more recipe-style examples on the web, so here’s mine. This is done using the Wireplumber session manager.

First, identify the audio device to disable using pactl list short. In the output from this, I could see an entry for the audio sink (alsa_output.pci-0000_27_00.1.hdmi-stereo-extra2.monitor) and for the audio device (alsa_card.pci-0000_27_00.1). It’s the alsa_card device that you want to disable, not the sink.

Wireplumber uses lua scripts to apply these kinds of custom configurations. So in my case, I created the file ~/.config/wireplumber/main.lua.d/51-disable-hdmi-devices.lua with the following code:

rule = {
  matches = {
    {
      { "device.name", "equals", "alsa_card.pci-0000_27_00.1" },
    },
  },
  apply_properties = {
    ["device.disabled"] = true,
  },
}

table.insert(alsa_monitor.rules,rule)

Then, restart the wireplumber service with systemctl --user restart wireplumber and this audio device should now be gone – you won’t see it in your sound settings or in your patchbay diagrams.

For reference, the above is working for pipewire v0.3.56 and wireplumber v0.4.11 on Manjaro Linux. I ultimately learned this via the Arch Wiki page for Wireplumber, though at first I got confused about the need to specify an audio device instead of a sink. That caused me to think this was the wrong solution, and I spun my wheels for more than a week trying other things (e.g, turning the device profile off in pavucontrol) which didn’t work.

Configuring the GNOME Shell Panel with Firefox and Thunderbird Profiles

Posted by Scott on Apr 2nd, 2020

Mozilla’s Firefox web browser and Thunderbird e-mail clients have a little-known feature known as “Profiles.” Profiles allow you to create fully separate instances of these applications, each with their own customized config preferences and extensions.

I make heavy use of this feature to create separate Firefox profiles for my personal everyday web browser, work web browser, web development browser, etc. With Thunderbird, I use profiles to separate my personal vs. work email.

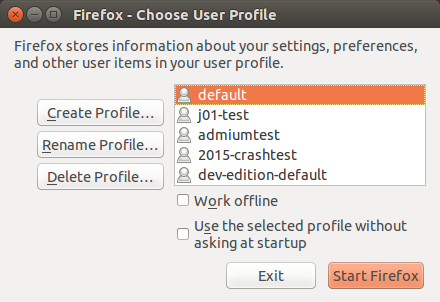
From the command line, invoking firefox or thunderbird with the -P option will bring up a dialog box, allowing you to chose between your existing profiles, or create/rename/delete profiles:

If you haven’t created any new profiles, you’ll be using a profile named default. On my Ubuntu systems, each of these profiles will be stored under your ~/.mozilla/firefox/ directory (for Firefox) or ~/.thunderbird/ directory (for Thunderbird).

If you want to be able to easily launch these profiles from the GNOME Shell GUI rather than the command line, you can create custom launchers for each profile. I typically do this and choose different icons for each profile to visually tell them apart. To do this, create a .desktop file within your ~/.local/share/applications/ directory. I typically name these files firefox-<profile-name>.desktop. Here’s an example of one:

[Desktop Entry]
Version=1.0
Name=Firefox (WebDev)
Exec=firefox -P webdev -no-remote --class FirefoxWebDev
Comment=firefox
Terminal=false
Icon=/usr/share/icons/oxygen/base/128x128/categories/applications-development-web.png
Type=Application
StartupWMClass=FirefoxWebDev

By default, the Icon setting will search for an icon file (e.g, .svg or .png file) from your current theme within your /usr/share/icons/ directory. Specify an absolute path to the icon file and include its filename extension if you want to use an icon that’s not in your current theme. You can also create custom icons and drop them in your ~/.local/share/icons/ directory.

Note that on the Exec line I’m also starting firefox with two additional options, -no-remote and --class. The -no-remote option prevents conflicts with other instances of Firefox that are running. The --class option specifies a window manager class, which you’ll also set for the StartupWMClass option. You can set this value to any string you like, but it must be unique (i.e, don’t re-use it in another .desktop launcher config).

If you don’t set a custom window manager class, all of your running profiles will be grouped together under the same icon in the GNOME Shell panel. That last subtlety has been an annoyance I’ve wanted to fix for a long time, and learning about it is what prompted me to write this post to share.

References: Mozilla docs on using the profile manager, AskUbuntu post on setting the window manager class

Screencast Video for New Yocto Developers

Posted by Scott on Feb 20th, 2012

After teaching a very successful Yocto Project hands-on lab at the Intel Developer Forum last September, I learned that there was a lot of demand for training resources along these lines. Rather than having me fly out to various Intel sites to teach these courses, I decided it would be better to develop some hands-on labs in video format, so we’d have some “scalable” training materials to meet the demand.

The first screencast video was publicly released last week at the Embedded Linux Conference in Redwood City, CA. It’s a half-hour long and combines some introductory theory with hands-on exercises you can follow along with.

Getting Started with the Yocto Project – New Developer Screencast Tutorial from Yocto Project on Vimeo.

Note: You’ll probably want to view the video in full-screen mode when viewing the more detailed slides and during the live demos. You can also directly download the video in Windows Media format (300 MB) or Ogg Theora format (500 MB).

Topics covered include:

  • An overview of the Poky build system
  • How the Poky sources are organized (types of metadata and where to find them)
  • How to build your first Linux image and run it under emulation
  • An introduction to recipes and an explanation of the most common types of metadata, using actual recipe examples
  • An introduction to layers
  • Where to obtain Yocto BSPs from
  • How simple it is to download and enable a Yocto BSP
  • Where to find further project resources (documentation, mailing lists, git repository, bugzilla)


By the end of this screencast, a new user will understand fundamental concepts about the build system, and be able to start their exploration of the Yocto Project with a solid foundation of knowledge.

Quite honestly, creating this screencast was pretty agonizing, as the video editing tools Linux offers are either horribly complicated or extremely unstable. Perhaps at some point I’ll write up everything I learned about screencasting and give a talk for PLUG. 🙂

This won’t be the last screencast, but I can’t promise a timetable for the next one just yet.

Review of the Sony Reader Wifi (PRS-T1)

Posted by Scott on Oct 19th, 2011

As mentioned in my previous post, I now have a Sony PRS-T1 ereader – my first e-ink device. Rather than run down the specs of it and cover the same things everyone else mentions in their reviews, here are some links you can follow to other reviews which I found useful:

Engadget Review: Sony Reader Wifi

MobileTechReview’s video review

Gadget Review: Sony Reader Wifi Review

I’ve been reading ebooks on a Samsung Galaxy Tab 7″ Android tablet for a while now, and never realized until now how much nicer an experience it can be to read using an e-ink device.

Here are a few observations I haven’t seen mentioned in other reviews…

A lot of reviewers prominently note that the device uses a full refresh when turning pages. This is true. However, the Sony is capable of doing partial page refreshes, and does so when bringing up menu items or when using the browser. I’ve noticed some mild “ghosting” effects when partial page refreshes occur, and I’ve heard that this is a common problem on other ereaders which do partial page refreshes. The full page refresh when turning pages doesn’t bother me in the least, and I actually prefer it knowing that it prevents the ghosting problem from occurring.

One thing I have been disappointed about is the Google Books “integration”. I originally assumed that the Reader had the actual Google Books Android application. This is not the case. Instead, when you click on the Google Books “app”, it actually loads the Sony Reader application, but brings you to a section of their site where you can search for the free Google Books. You cannot retrieve or purchase ebooks directly from Google Books using the device. I can however download my purchased books from Google Books and then sync them to the Reader using a PC.

I do find it quite handy to have access to a web browser, even though scrolling on it is cumbersome with the e-ink refreshes. Here’s a tip – don’t use your finger to scroll the web page. The prev/next hard buttons will perform a page up/page down action on the web page, minimizing the refreshing latency.

The glossiness of the plastic bezel hasn’t really been an issue. It does attract fingerprints, but I also don’t really notice it that much. These issues could be resolved by getting a thin gel case if they really bother you. My guess is the type of people who get worked up about such things are also the type who can’t stand to break in the binding of an actual paperback book they’re reading. 🙂

Apart from the unwelcome surprise of the Google Books non-integration, I’m quite happy with this device. Also, there is news that the Reader has already been rooted, so in a short time I look forward to having the ability to install arbitrary android apps on the device. Google Books will certainly be one of them, as will ReadItLater.

LCD Image Persistence – A Solution that Works

Posted by Scott on Mar 4th, 2011

For a while I’ve just ignored my issues with LCD image persistence – essentially the same thing as screen burn-in on CRTs. Fortunately, LCD image persistence is not permanent. I’ve read conflicting accounts of how to get rid of it, but haven’t had any luck with methods I’ve tried.

Until now, that is. This short guide explains that the quickest solution to LCD image persistence is to force your displays to alternate between all-black and all-white images. It mentions doing this with a photo slideshow screensaver. I did it with the GNOME screensaver utility, let it run overnight, and my image persistence problems are gone. Just thought I’d share the solution that worked for me.

Blog Badges


[FSF Associate Member]

Archives